I had a new toy, or rather set of toys, arrive in the autumn - sets of letter stamps (both upper and lower case) and a set of numbers. I bought them from a US etsy seller, NextofKenn after hunting for a font that was a little bit different from the standard but still easy to read and not too fancy - I think that these were well worth the wait!
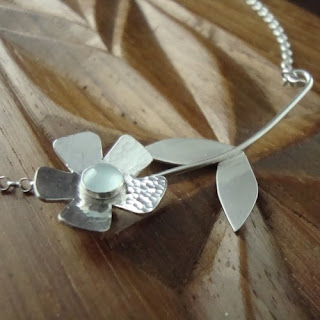
I didn't have the chance to do much with them before Christmas, but I've had the words "personalised? stamped? dates on back?" written next to my original sketch of my lovebird pendants for months, so last night I finally finished and uploaded my new and improved personalised Lovebird pendants to my website and to my noths store!
I've combined the original separate silver and gold lovebird listings into one to make life a bit easier to everyone, and you can choose whether or not to have any personalisation, and what wording you would like. There is room for approximately 8 characters.
And, while I was on a roll, I've also made matching Lovebird earrings! I am so pleased with these. I don't usually wear long earrings any more, I got out of the habit when B was a baby, but I've been wearing a pair of these since I gave them their final polish and I love them! They are so comfortable! I've got a pair with sterling silver wings coming shortly too.
My Studio Blog has now moved over to http://blog.joannetinleyjewellery.com/blog.
I hope that you will join me over there!
Sunday, 31 January 2010
Saturday, 30 January 2010
Counting my blessings
I've definitely been in a bit of a funk lately. A combination of the January blues, not enough sleep, and not enough shed-time - yes, shed-time is a recognised and legitimate cure for the Jo-blues in our household! There's not much that can be done about the January blues apart from work through them, remind yourself that you have a lot to be thankful for and wait for February! The sleep issue, well, the sensible thing is to get more sleep, but unfortunately as B was ill last week and I still had deadlines to meet, the only time I could work was at night. I know I'm not alone, it's what all work-at-home mums have to do, at least some of the time, and I know that I am really fortunate to have the amount of work time that I do - which brings me on to the other reason for my funk - guilt! How on earth could I be worrying about deadlines and wanting to get into the shed when my baby was ill?!
Anyway, the funk is on it's way out (and about time too T would say!), February is nearly here, the birds will start singing again soon, so I think I'll count my blessings (in no particular order)
- I have a wonderfully supportive family who don't think it strange at all that I work in a shed and hammer metal, and usually ooh and aah when I show them something that I've just designed.
- T's job is changing and he is already looking less stressed and sleeping better as a result.
- B is a cute, friendly, cheerful (usually!), healthy, funny little boy who knows the difference between knitting and crochet as well as between diesel and steam engines and his chicken pox spots are nearly gone. Thank you for the best wishes you sent!
- The rest of my family are generally happy and healthy.
- I love my job! And I love the fact that I can pass my skills and ideas on to others through my classes and magazines - and isn't it amazing to actually get paid for doing what you love?!
- I have decided at last to get a cleaner in once a week. I've realised that I can't do everything, and that the business can pay for her as I have clients visiting the house. I've been umming and aahing about this for nearly two years, and finally the realisation that I could be spending more of my free time with B and T rather than frantically cleaning up after them overcame the guilt at paying someone else to do 'my work'.
- I had a lovely morning looking after my God-daughter Gracie on Thursday while T and her mummy and daddy packed up the van for their move. I'm trying to think of their move as a blessing too as it's a much much nicer area......might take me a while though :(
- My friend Helen has come home from Texas and she and her husband will be moving down south sometime this year - hurray! I will phone you this weekend Hellie, I promise!
- My business is growing and thriving - people actually like and buy my work! Wow! You think I would have got used to that by now, but I don't think I ever will.
- T actually tidied up his side of the bedroom this week - I think it may have had something to do with the fact I told him that the cleaner wouldn't tidy up his dirty clothes. He is wonderful in many ways, but is not the tidiest person in the world. He would say I'm not either but in my defence things are only left out if I'm actually working on them, and I put my washing in the basket.
Labels:
family,
general waffle
Tuesday, 26 January 2010
Tutorial Tuesday - photography light diffuser & photography tips
I've been meaning to write a blog post about taking jewellery photos for ages, but I've found a post on Boo's blog that covers a lot of what I was going to write about and a lot more besides.
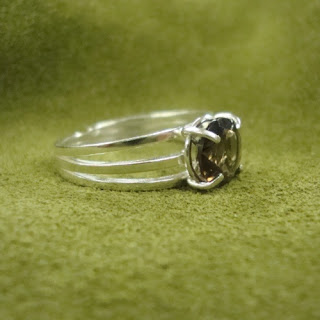
My photos have improved dramatically over the last couple of years. I mean, just compare this photo
to this one!
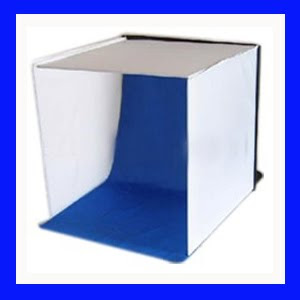
I spent hours and hours experimenting with different lights and set ups, and now use a light studio like this
with a brown cloth hanging from the top of the back so that it sweeps down and covers the back and the bottom of the light studio without there being a distinctive line where the back and bottom meet - I will edit this post tomorrow when B has gone back to school with a photo of my set up!
My tips for photographing jewellery are:
- make sure that your camera has a good macro setting. I use a simple compact digital camera, a Sony 1080 cybershot if you're interested. I took some jewellery up to Jessops and the assistant and I spent ages comparing the macros on different cameras! The macro setting is usually symbolised by a flower, and it will allow you to get in close with clear definition.
- use the white balance/iso setting on your camera. This was something that I didn't really know about until this summer when a fantastic photography tutor came in to talk to my advanced college class and show them (and me!) how to make the best use of their camera. It is amazing the difference just changing the light balance on your camera will make, even just choosing one of the automatic settings your camera is programmed with. Before I knew about this tip I thought I could only take photos either in diffused sunlight (my favourite in the summer is early morning or late afternoon sun, taken under the awning over our decking i.e. beautifully clear light, but diffused) or in complete darkness other than my daylight bulbs in the photo studio. Well, the photo below isn't my best ever, but would you believe that it was taken with the jewellery on top of my bag, under the harsh class room lights during my advanced class a couple of weeks ago?! I promise it hasn't been edited apart from cropping and then resizing so that it would load up quicker.
- Think carefully about your background. I chose to use brown as my background as the jewellery shows up well and it's my main 'business' colour. It (and my props) are nice and warm compared to the colder colour of the silver. The wooden props that I use carry a theme through all my photos, and I also like that they have meaning for me. T turned the wooden bowl and cup that I use, and the wooden box contains a came of mancala that my brother brought back from his travels. Have a look at what other people use as backgrounds and props. Remember that you want a theme so that people recognise your photos and so that your website/etsy page etc doesn't look messy, but that doesn't mean that you have to use the same props and colours all the time.
- Take lots of photos from lots of different angles. This is for two reasons: firstly, you want lots of photos so that you can choose the best ones. Secondly, if you are selling jewellery on a website people can't touch it, feel it (obvious, I know) so you have to show it to them as clearly as possible.
Monday, 25 January 2010
Spotty boy
Sorry I've been a bit quiet the last few days - my boy has chicken pox! He's over the worst of it now, thankfully, should be back at school on Wednesday. I've had a not-too-pleasant preview of what he might look like as a spotty teenager though! We've spent our time mainly making lego vehicles and cuddled up under the blanket on the duvet watching old videos of Stingray and Thunderbirds. B posed the vehicles above and took the picture himself! I think my favourite is the truck with the propeller on the back - apparently it makes the truck fly backwards.
Labels:
family
Friday, 22 January 2010
Is it a burglar? Is it a ghost?
No, the horrendous crashing sound and the just plain weird scrabbling noises that woke us up in a bit of a panic last night were caused by Millie the cat.
Yes, that cat. The so-cute pretty little tabby who tries to convince visitors that we never feed her. The cat that usually sleeps at my feet like a little hot water bottle but sometimes decides to come up and sit on my pillow, virtually on top of my head. She may look like a sweet kitten but she'll be 10 this summer and she's getting to me a demanding old lady. I swear, if she were human she'd be wearing purple and doing more than just running her stick up and down the neighbours fences!
Anyway, the noise. This is what the air vent (is that the correct term?) cover used to look like in our bathroom.
And this is what it looks like now.
Over the last week Millie has taken to sitting on top of the cistern of the toilet. Heaven knows why. More of the demanding old lady issue I think. I don't particularly like it as the bathroom had, until then, been a cat hair free room. Last night, for some strange reason, she must have decided to reach up and start to try to pull the cover off to see what was behind it. She pulled it off the wall (the plaster's not wonderful on that wall), and the crashing sound was the cover and lumps of plaster falling into the bath. The scrabbling sound was her trying to climb into the vent. I kid you not. When I went into the bathroom to see what on earth was going on, she was halfway up the wall, holding onto the edge of the vent with her front paws, scrabbling with her back paws, with her head almost all the way inside the hole. Honestly.
She's sitting on my lap as I type this, purring and trying to convince me that I was dreaming and she's a well-behaved puss cat. But I know better - I have the scratch marks on and the hole in the wall to prove it!
Labels:
general waffle
Wednesday, 20 January 2010
Tutorial...erm....Wednesday - Simple Hammered Clasp
I went to bed early last night with a nasty headache and left this post half done - sorry! So, it's Tutorial Wednesday this week instead!
I decided that it was about time that I wrote another tutorial or two myself. It's fun linking to other people's tutorials and I like finding yet more ideas to add to my ever-growing 'must-do' list, but it's fun to write my own too. So, you've had tutorials on eye loops, wrapped loops, coils and ear wires, so this week it's the turn of clasps.
I love to make clasps that compliment the rest of the piece of jewellery that I've made, and they are much much easier to make than you may think. I'm starting with a simple hammered clasp to compliment a necklace that I'm making as an example for my Hammered Chains workshop next month.
You will need:
Use your round nosed pliers to turn a loop at the end of your length of wire. I prefer to work from the reel of wire most of the time, especially when I'm making a particular size of clasp for the first time and I'm not certain exactly how much wire I'm going to need.
Decide approximately how long and wide you want your clasp to be. Hold the wire with the round nosed pliers at the extreme of the length you wish your clasp to be and turn a U shaped bend. The further down towards the handles of your pliers you place the wire when you make the bend, the wider the clasp will be.
Cut the wire level with the loop you formed at the start.
Use the round nosed pliers to 'flick out' the last 5mm-1cm of your U shaped bend. This gives your work a more professional finish and also makes the clasp easier to use - easier to fasten but far less likely to come undone by accident.
Use your finger and thumb to manipulate the sides of your clasp so that they meet....
And use the round nosed pliers to manipulate the shape of the clasp too if you wish.
This is the optional part ... soldering the starting loop closed can help to strengthen clasps made of thinner wire than I've used here. Place a small piece of easy solder onto the join of the loop and gently heat the silver to melt the solder and close the join. Quench, pickle and rinse the clasp.
And this is the fun part! Hammer your clasp to give it the texture you want and also to strengthen it. You will probably have to push the clasp back into a closed shape after hammering as hammering will encourage the wire shape to spread out.
File and sand the end of your clasp to remove any sharp edges
And finally ... attach the clasp to your piece of jewellery and enjoy!
Once you've made a couple of clasps you should become more confident in changing the basic shape to better suit the piece of jewellery you're making it for. Perhaps try turning the U shape around a pen barrel of piece of doweling instead to get a wider shape.
I decided that it was about time that I wrote another tutorial or two myself. It's fun linking to other people's tutorials and I like finding yet more ideas to add to my ever-growing 'must-do' list, but it's fun to write my own too. So, you've had tutorials on eye loops, wrapped loops, coils and ear wires, so this week it's the turn of clasps.
I love to make clasps that compliment the rest of the piece of jewellery that I've made, and they are much much easier to make than you may think. I'm starting with a simple hammered clasp to compliment a necklace that I'm making as an example for my Hammered Chains workshop next month.
You will need:
- 1.2mm sterling silver wire, or a thickness that compliment the rest of your design. The thinnest wire I use for clasps is 0.8mm (20 gauge)
- easy solder & flux & soldering equipment - safety pickle & pot, tweezers, quench pot, fire brick, goggles - these are optional
- round nosed pliers
- wire cutters
- hammer to texture your wire
- needle files
- emery paper
Use your round nosed pliers to turn a loop at the end of your length of wire. I prefer to work from the reel of wire most of the time, especially when I'm making a particular size of clasp for the first time and I'm not certain exactly how much wire I'm going to need.
Decide approximately how long and wide you want your clasp to be. Hold the wire with the round nosed pliers at the extreme of the length you wish your clasp to be and turn a U shaped bend. The further down towards the handles of your pliers you place the wire when you make the bend, the wider the clasp will be.
Cut the wire level with the loop you formed at the start.
Use the round nosed pliers to 'flick out' the last 5mm-1cm of your U shaped bend. This gives your work a more professional finish and also makes the clasp easier to use - easier to fasten but far less likely to come undone by accident.
Use your finger and thumb to manipulate the sides of your clasp so that they meet....
And use the round nosed pliers to manipulate the shape of the clasp too if you wish.
This is the optional part ... soldering the starting loop closed can help to strengthen clasps made of thinner wire than I've used here. Place a small piece of easy solder onto the join of the loop and gently heat the silver to melt the solder and close the join. Quench, pickle and rinse the clasp.
And this is the fun part! Hammer your clasp to give it the texture you want and also to strengthen it. You will probably have to push the clasp back into a closed shape after hammering as hammering will encourage the wire shape to spread out.
File and sand the end of your clasp to remove any sharp edges
And finally ... attach the clasp to your piece of jewellery and enjoy!
Once you've made a couple of clasps you should become more confident in changing the basic shape to better suit the piece of jewellery you're making it for. Perhaps try turning the U shape around a pen barrel of piece of doweling instead to get a wider shape.
Tuesday, 19 January 2010
Keum Boo Tuition
Yes, after mentioning it months ago, Keum Boo tuition is finally here!
For those of you who haven't come across this technique before, let me tell you, it is magical! Keum Boo is an ancient Korean technique that literally translates as 'attached gold'. 24k gold is bonded to fine silver through a combination of heat and pressure - no solder is used, and the process really does look magical! It is a beautiful way of using gold in your designs without breaking the bank. I've been planning on offering Keum Boo private tuition for several months now, and I thought that the New Year was a good time to start, so here it is!
A day's tuition costs £130, including the first £10 of silver, gold foil valued at £15, lunch and refreshments. There will be enough foil for you to be able to take some home with you at the end of the day. I've worked out that a day's tuition will allow most people to produce two simple or one more complicated piece of jewellery, and like my silversmithing tuition, the idea is that you make a piece of jewellery that you like in your own style. There's no point in paying for private tuition if you can't choose what you'd like to make!
There are information sheets to take away with you, and the day will cover lots of general silversmithing techniques as well as the Keum Boo and I could go on, but for more information see here! But one of the most important things to tell you now that, just as when I introduced the silversmithing tuition, I've decided to give a discount to the first five people who book Keum Boo tuition - instead of £130 it will cost £120 - but you will need to be quick as the first five silversmithing places went very quickly when I offered this before!
And if you'd like a go at Keum Boo but you're not sure about the whole day, I'm also running a Keum Boo taster workshop for 6 people on Saturday 13th March at £35 per person - see here for details!
And for those of you who like your silver without any gold, I'm running another hammered chains workshop on Saturday 13th February - and you can find details of that here!
Labels:
keum boo,
silversmithing,
tuition,
workshops
Monday, 18 January 2010
Let's get the party started!
The Bead Soup Party is well under way!
Over 80 jewellery designers/lampwork artists/polymer clay artists signed up to Lori's virtual party in the end! My partner is Lynne, a lampworker who lives in Canada, such a beautiful part of the world. She's probably had a good giggle at the snow pictures I posted yesterday! Anyway, we had a few emails back and forth about colours, styles etc and there are now two parcels crossing the Atlantic. Lynne emailed me today to let me know that she'd posted a picture of the beads she's made me on her blog and I was going to be good and not peek - honest I was! The problem is that I got more and more emails during the day from others in the party saying that they'd posted pictures of their swaps and - yes, you've guessed it - I've just succumbed to temptation. Lynne has been so generous and made me some beautiful beads - just check out those amazing hollows and the black and ivory focal bead in particular - aren't they gorgeous?
So, of course, I've got to show you what I've sent as well now, haven't I? Lynne, if you don't want any spoilers, look away now.......
We were all asked to send our partners a focal bead, some spacer beads and a fancy (i.e. not just a trigger) clasp. Now, as you know, I use beads rather than make them, so I decided that instead of sending Lynne a gemstone focal or a lampwork bead made by someone else that I'd make her a silver focal or two....okay, or three - odd numbers always look so much better! I've made some leaves like this before but not for ages, and somehow it seemed appropriate to make leaves for a Canadian as when I think of Canada I think of snow, maples (and maple syrup, yum!) and moose. So, I've made a few improvements on the design I used a while back and made Lynne these:
And these are the rest of the goodies. It's a mix of smoky quartz, freshwater pearls, carnelian and an agate - although I can't remember which agate those large button beads at the front are, so if anyone know, please remind me!
There have been some amazing beads swapped - follow the link here or from the Bead Soup invite to see the list of artists taking part and go and have a look - and if you like what you see, make sure that you join in next time!
Sunday, 17 January 2010
The last of the snow!
We went for a walk with my parents in some woods near their house this afternoon. There was still some snow left in the shadest places, despite the sun having come out, and B made the most of it!
Labels:
family
Wednesday, 13 January 2010
Daisy Daisy
I've been very snug working away in my shed this week, despite the snow and ice! I've been cutting and soldering lots of lovebirds and bangles for orders, but I've also been able to finish some new designs - so, introducing the Baby Daisy cuff and the Full Bloom necklace!
The cuff is made of smaller daisies than the Daisy cuff, but is formed in the same way - pierced (hand sawn) from sterling silver sheet, lots of filing and sanding and then shaping around a mandrel. This is actually an older design that I've improved - I wasn't quite happy with how it sat before, but I'm really pleased with it now.
And I am delighted with how the necklace turned out. I actually started work on this before Christmas, but I didn't have time to pick it back up again until this week. It's one of those rare designs that worked perfectly from sketch to polishing. The chain is attached to either end of the daisy, and the clasp is hidden behind the flower itself. It sits beautifully, and I've got another one part made that is going to be for me as I like it so much! I haven't decided what stone to put in the middle of mine though, but the fun part is sorting through my slowly growing cabachon collection! The only reason the collection is slowly growing is that I keep using them!
The new designs are part of my Bloom Collection and a big THANK YOU to those of you who bought a piece from this collection in the run up to Christmas as I donated 10% of the sales to the Wessex Cancer Trust, a charity that provides vital support to cancer patients and their familes. I am delighted that £25 was raised for the Trust, and I have decided that 10% of all sales of the Bloom Collection will go to the Trust from now on. Why Wessex Cancer Trust? I know that there are many many worthwhile charities out there who need our support, but the Trust was a great help to a colleague of mine and his family, and I have seen the fantastic, often heart breaking work that the staff and volunteers at the Trust do. To find out more about their work visit www.wessexcancer.org!
Tuesday, 12 January 2010
Tutorial Tuesday - note book cover
A sewing machine was one of my Christmas presents this year (last year? Seems strange saying last year when it was only a couple of weeks ago!) I've been wanting a new sewing machine for ages to replace the electric one that my Grandma gave me when I was a teenager, and my parents and brother clubbed together to give me some money towards this beauty. And even better, my uncle has let me have my Grandma's beautiful Singer machine - one of the old ones with a wooden base and cover! I'm really excited as that's the machine both my Mum and I learnt to sew on, and I remember it as being so lovely to use. Of course, it's been sitting in my uncle's loft for the last dozen years, so once I collect it from my parents it's going to need a good service, but luckily there's a good place down the road that can do that for me. Now all I need to do is to find room to set them up - and find the time to use them! That's actually been the hardest part as although January has in the past been a quiet time for me I've been busy with lots of orders, lots of private tuition and lots of magazine work. Now don't get me wrong, I'm definitely not complaining that I'm busy, but I think I'll book an afternoon off soon and play with fabric rather than sheet metal!
I've certainly got plenty of projects lined up for when I've built up my sewing confidence again, and the notebook cover above is one of them. I like having lots of notebooks around as I never know when I'm going to need to sketch an idea out or add yet another item to my 'must do' list, but they can get rather battered in my bag so, a cover should help. Perfect for last minute presents too! You can find the instructions at moonstitches. Right then, I'm off to polish some new designs and orders, take photos, wrap up parcel, oh yes, and cook tea for my boys!
Sunday, 10 January 2010
A perfect marriage of yarn and lego!
How cool is this?! I wonder if B's lego skills are up to making one for me......
Labels:
knitting,
other crafts
Saturday, 9 January 2010
Bead Soup Party!
Fancy coming to a party? Lori over at Pretty Things is having a Bead Soup Party
and you're invited - but you must RSVP by tomorrow!
Labels:
blogs
Beads and Beyond
Hurrah! The February issue of Beads and Beyond is here! I've just come from the shed to get a drink to find that our postie has taken advantage of the cleared road and pavements and brought us the first mail for what seems like a month, but is really only four days or so. He is good, but the ice rink that was our road defeated him for a while! Having said that, I've still got my copy so early that they haven't had a chance to update the website yet so I can't pinch borrow a picture of the front cover! The magazine is due out next week, so you've got a bit of notice to go and find a copy.
I've got a four-page article in the magazine this month - and for the first time in months I actually remembered to take photos of the jewellery before I sent it off! The projects use smoky quartz and teach you how to make findings by melting the send of silver wire in the flame of a blow torch. The main project is the necklace above, but I think my favourite is the pair of earrings below that use sparkly faceted briolettes.
There's a really good mix of projects in there this month - a lampwork bead heart, lots of bling for Valentine's Day, and the most exquisite wire crocheted pearl bracelet.
My campaign to have the most projects on the Beads and Beyond website is making good progress, by the way - click here to find another earrings tutorial!
Labels:
Beads and Beyond,
magazines,
tutorials
Brrrrr....
Well, the snow has started to melt away from our garden! It has been a bit of a strange week - a lovely week in that we've played as a family in the snow and B has loved it! I would show you more photos than the one below, but every time I tried to get the camera out (and get my frozen fingers to work the buttons!) B and T would throw snow balls at me so this is the best I can do - B's friend from across the road had come over to play and his Mum and I had just run in doors to defrost. This shot was taken as the snowballs hit the kitchen door!
If you would like more picturesque photos of the snow, head over to Laura's blog - they had a lot more in Oxfordshire than we did in Southampton!
The strangeness of the week has been due to the fact that for the first three days of the Big Freeze no one could get out of our road safely to get to work as we live at the top of a steep hill that is a turning off a busy road that is, yes, you guessed it, another steep hill! The only place where it's flat round here is down at the river! The problems round here haven't been due to the snow - as I said, we haven't had nearly as much as even the villages just outside of Southampton - it's the ice that has been so dangerous. T and I have taken it in turns for much of the week to work while the other looks after B. Thankfully he can work from home for some of his job. Half the street turned out yesterday, though, to finally clear away the rest of the snow and ice, so things are starting to get back to normal now - whatever that is! B and T have gone out to play in the warmth of one of the many soft play centres round here, so I'm off out to the shed now to finish off the new designs I've been working on. I should be back later with some photos!
Labels:
family,
general waffle
Tuesday, 5 January 2010
Tutorial Tuesday - November Sweater
This is my current knitting project - well, one of them, anyway, and I'm loving knitting it so much that I thought I'd share it with you.
It's called November Sweater and is designed by Meghan and is available free on her blog Allergic to Wool. It's her first official written up pattern, and as far as I'm concerned it's a great success - lovely lace pattern, very little seaming to do afterwards and a quick knit, which is definitely what I need at this time of year! I started a couple of days before Christmas, and even though I haven't had a great deal of knitting time this holiday I'm already two-thirds through the second side. There are only two pieces as it's knitted side-to-side.
I'm using Patons Smoothie acrylic DK yarn that just called to me as the colour is gorgeous. I haven't bought an acrylic yarn for ages for anything apart for baby knits that I know will be machine washing alot, but I'm really pleased with this one. Meghan however used DK yarn that she recycled from a charity shop sweater - one of my aims this year is to see what yarn I can reclaim from charity shops!
Sunday, 3 January 2010
New Year Sale!
In keeping with the best New Year traditions, I'm having a sale on my website for the month of January - there is currently 15% off all jewellery, including my Keum Boo designs that feature 24k gold.
The website has automatically adjusted the prices, so *puts on her best marketing voice* now is the time to go and buy yourself a treat or stock up on a few presents for later in the year!
Labels:
special offer,
website
Saturday, 2 January 2010
Happy New Year!
I hope that you all had a lovely Christmas break! Ours involved putting together lots of playmobil vehicles and lego sets - can you guess what B got for Christmas?! I actually really enjoyed playing with them helping B - my brother and I were always given a big lego set between us for Christmas but as lego was a "boy's toy" it was always kept in my brother's room and I didn't get to play with it that much - can you hear the violins?!
We've had a fairly quiet couple of weeks, lots of family time playing and seeing friends. It was just what we needed after such a busy term, but I am now definitely looking forward to getting back to work properly on Monday! Not that I completely stopped for more than a couple of days mind as I kept the website and noths shop open for orders and had to send those off. I've also used the time to make some changes to the website and to finish a few one-off pieces that had to be put to one side in the pre-Christmas rush.
Cabled cardigan for a friend's daughter
Cardigan and booties for our new (5 day old!) niece
We've had a fairly quiet couple of weeks, lots of family time playing and seeing friends. It was just what we needed after such a busy term, but I am now definitely looking forward to getting back to work properly on Monday! Not that I completely stopped for more than a couple of days mind as I kept the website and noths shop open for orders and had to send those off. I've also used the time to make some changes to the website and to finish a few one-off pieces that had to be put to one side in the pre-Christmas rush.
Do you remember this post last year? I actually didn't do too badly with my aims for the year (I still don't like the word resolutions!). I met about 75% of the business aims I had, including doing more silversmithing teaching, finding new outlets both 'real life' and web based and doing more magazine work. Quite a few of the aims left over aren't relevant any more, so I'm feeling pretty pleased with myself. On the non-business side, well, my aim of knitting more definitely took off! The aim of swimming every week didn't go quite so well, so rather than focusing on that, how about I show you some of the Christmas presents I knitted?
Cabled cardigan for a friend's daughter
Cardigan and booties for our new (5 day old!) niece
There were a few other pieces as well, but in my rush to finish them and get them wrapped up, I forgot to take photos - ooops!
Subscribe to:
Posts (Atom)