
A tutorial from me this week! It's been a while since I wrote a tutorial for the blog - I'm always busy designing projects but most of them end up being sent off to magazines! This tutorial is for an earring design that I used to make a lot of for craft fairs. I'd almost forgotten it until a friend asked me to make a couple of pairs for her to give as presents as she liked the ones I'd made her a couple of years ago so much. I thought I may as well take photos as I made them, and also made a few more pairs too - one pair for me, a couple of pairs for a coffee morning at my Mum's on Thursday, and anothercouple of pairs for a giveaway. Details of how to enter are at the end!
You will need:
18cm 0.8mm wire
6 beads with holes not much larger than 0.8mm
hammer
bench block
round nosed pliers
wire cutters
nylon jaw pliers
flat needle file
To start, cut two 9cm lengths of 0.8mm wire. This will make you earrings approximately 4.5cm long. If you'd like them to be a different length then cut your wire accordingly! If necessary use the nylon jaw pliers to straighten the wire.

Lightly hammer the last 5mm of one end of each piece of wire. You are basically turning the wire into head pins so that beads will not fall off the end.

File the hammered ends so that they are nice and rounded. Give them a quick sand if necessary. I tried and failed to take a photo of me filing the wire, so instead here's a photo of one piece of wire filed and one before filing so that you can hopefully see the difference between them.

Thread on your beads. The bottom bead should fit snuggly on to the hammered part of the wire so that it doesn't fall off. Now is a good time to compare your pieces of wire. Make sure that they are the same length and the hammered section below the bottom bead is the same on each earring. Trim and file the wire if necessary.

Use a mandrel such as a pen barrel to bend the wire into a U shape with each leg of the U the same length.

Use nylon jaw pliers to flick out the last 5mm or so of wire - I find this makes the earrings easier to put on and also gives them a more professional look. File the end of the wire so that it is comfortable to pass through your ear.

Lightly hammer the front of the earrings to strengthen them. This photo shows how I hold the earrings on the bench block so that the beads do not get damaged by the hammering.

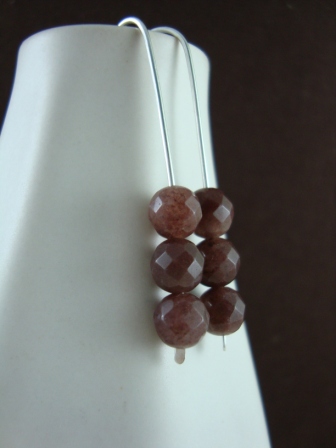
And that's it! Of course you can use as many or as few beads as you like, assuming that they will fit on the wire, but I think that odd numbers of beads usually look best. I've used purple jade beads that are actually a bit more plumy purple than the photos here show. I love the translucent appearance of jade - it makes lovely dreamy soft coloured beads.

Anyway, I mentioned a giveaway! It's been far too long since I had one, so I thought that as we've got two Bank Holiday weekends in a row (and both four day weekends at that thanks to the Royal Wedding!) that I'd have two giveaways, both for a pair of the purple jade earrings that I've just shown you how to make.
The first giveaway is for people on my mailing list - so if you're already on my newsletter mailing list then you're in the draw already, and if you're not just use the link on the left to sign up and get entered! To enter the second giveaway all you have to do is leave me a comment on this post and let me know the last thing you created, be it a cake, jewellery, beads or a mess in the kitchen, cos I'm in a nosey mood and anyway, I show you what I make!

You can enter both giveaways, but I'll make sure that there are two winners to be fair, and the giveaways are open to any country. You have until midnight next Monday 2nd May to enter - good luck!

I love these simple designs. Please enter me in for another chance to win. The last thing I made was a felt vessel at the weekend. It's on my blog www.tizduster.typepad.com
ReplyDeleteThe earrings are beautiful. I love wire but I always hurt myself! The last thing I made was a Beaded Adventurine Cuff. You can see it at http://gemtrails.blogspot.com/2011/04/whew-done.html
ReplyDeleteLove your tutorial! I am going to try it straight away.
ReplyDeleteNow I am working on wedding jewelery.
I love your tutorials, fabbo!! You make it look so easy - I wish!! Right now with silver being so expensive, I'm messing with acrylic xx
ReplyDeleteWould love to win these. Have just finished a necklace with gorgeous Isabelle Anderson beads ready for North Somerset Arts Week which starts on Friday!
ReplyDeleteI made some sweet floral rounds just like the earrings on my blog . I'm going to make a necklace with them. Thanks for the giveaway!
ReplyDeleteI'm following and subscribed to the newsletter. I've got to head to work, but I can't wait to check out the other tutorials you have up.
ReplyDeleteWell, hello there! Just found your blog thanks to Deci @GemTrails. These are lovely earrings! I love wirework, but it's not my expertise. I beadweave, so the last thing I made was a beadwoven peyote and strung bead necklace for a button challenge. Thanks for the lovely giveaway!
ReplyDeleteI like your tutorials a lot. I learn so much from them, as I am only silversmithing for a year or so, I still have to learn a lot :)
ReplyDeleteSo thank you for this one, I'll give it a try today I'm sure.
Last thing I made was ten pairs of earrings, trying desperately to make sure they weren't all turquoise! As that is the only colour I seem able to create in when left to my own devices....Beautiful earrings and really great to see them 'on' - they hang beautifully.
ReplyDeleteWhat a lovely tutorial!
ReplyDeleteI would love to win these.
I have made something similar in the past by trial and error. Will have to give your tutorial a try. Keep them coming :)
Great pair of earrings.
ReplyDeleteFab tutorial Jo. Love the beads you've used too. The last thing I made was a few lace in resin drop shaped pendants.
ReplyDeleteGemxxx
The last thing I created is small wooden bracelet .
ReplyDeletekasia433(at)onet.eu
WOW! These are really nice! Thanks so much for the wonderful tutorial- you always have such great photos and directions! I'll be linking.
ReplyDelete